How to Use AI in HubSpot Workflows
by Richard on Jun 30, 2024

Leveraging artificial intelligence (AI) in your HubSpot workflows can revolutionize the way you manage and engage with your contacts. By integrating AI, particularly using OpenAI's API, you can automate complex tasks such as analyzing contact data to categorize and segment it more effectively. In this tutorial, we will walk through the benefits of using AI in HubSpot workflows, how to add custom code actions to interact with OpenAI's API, and how to save the AI-generated responses into a HubSpot custom property.
Exploring the Benefits of AI in HubSpot Workflows
Artificial Intelligence (AI) has revolutionized various industries, and HubSpot workflows are no exception. By incorporating AI into your workflows, you can unlock a range of benefits that can enhance your marketing and sales processes.
One of the key benefits of using AI in HubSpot workflows is the ability to automate repetitive tasks. With AI-powered automation, you can save time and resources by letting the system handle mundane tasks such as data entry, lead qualification, and follow-ups. This frees up your team to focus on more strategic and high-value activities.
Integrating AI into your HubSpot workflows offers numerous advantages:
- Enhanced Data Analysis: AI can process and analyze large volumes of data at high speed, identifying patterns and insights that might be missed by manual analysis.
- Improved Contact Segmentation: By categorizing contacts based on their behavior, preferences, and engagement history, AI can help create more targeted and personalized marketing campaigns.
- Increased Efficiency: Automating repetitive tasks allows your team to focus on more strategic activities, driving overall productivity.
- Predictive Analytics: AI can forecast trends and customer behavior, enabling proactive decision-making and better resource allocation.
- Personalized Communication: AI can tailor messages based on individual contact data, ensuring more relevant and effective communication.
By embedding AI within your workflows, you can transform raw data into actionable insights, enhancing your marketing, sales, and service efforts.
Using AI to Analyze HubSpot Contact's Data
One of the powerful use cases of AI in HubSpot workflows is analyzing contact data to gain valuable insights. By using AI algorithms, you can extract meaningful information from your contact data and use it to optimize your marketing and sales strategies.
To integrate OpenAI API with HubSpot, you'll need to use custom code actions within your workflows. Follow these steps to set up and use the API.
Step 1: Set Up Your Environment
Before you begin, ensure you have the following prerequisites:- A HubSpot account with Operations Hub Pro or Enterprise license.
- An OpenAI API key. You can obtain this by signing up on OpenAI’s website.
- Basic knowledge of HubSpot Custom Code actions, JavaScript and HTTP requests. If you dont know how to make API calls, check out my post on How to make API calls from Custom Code actions inside HubSpot Workflows.
Step 2: Create a New HubSpot Workflow
- Navigate to your HubSpot account and go to Automation > Workflows.
- Click Create workflow and choose the type of workflow that suits your needs (e.g., Contact-based, Deal-based). For this tutorial we will be using a HubSpot Contact-based workflow.
- Set up your enrollment triggers to define when a contact enters the workflow.
Step 3: Add a HubSpot Custom Code Action to your Workflow
- In your workflow, click the + icon to add an action.
- Choose Custom code from the list of actions.
- Select Node.js as your runtime environment.
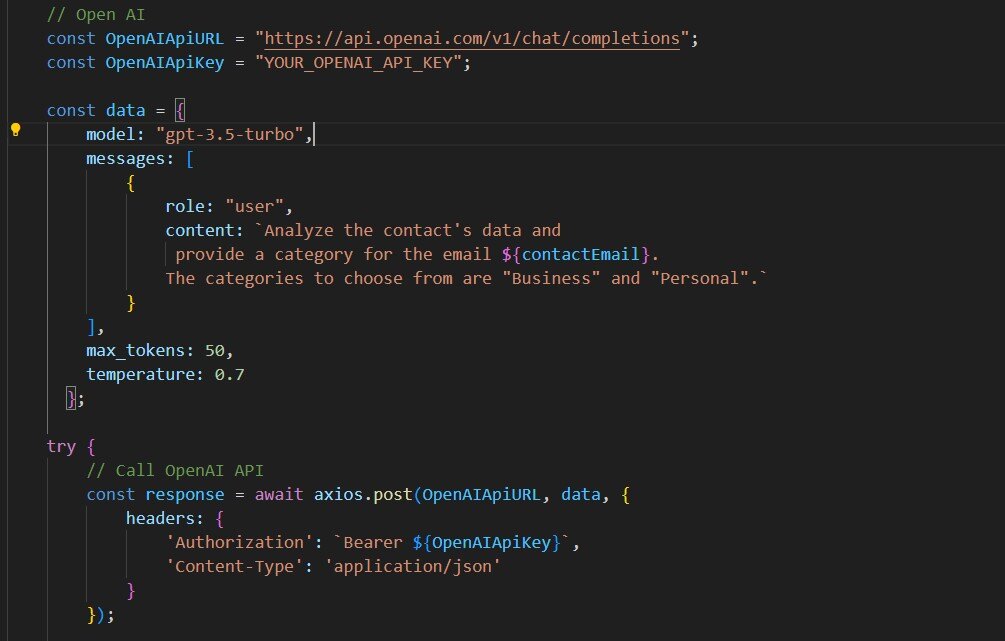
- Paste the following code snippet into the code editor:
const axios = require('axios');

exports.main = async (event, callback) => {

    // Input
    const contactEmail = event.inputFields['email'];

    // Open AI
    const OpenAIApiURL = "https://api.openai.com/v1/chat/completions";
    const OpenAIApiKey = "YOUR_OPENAI_API_KEY";

    // Modify "content" with your desired prompt
    const data = {
        model: "gpt-3.5-turbo",
        messages: [
            {
                role: "user",
                content: `Analyze the contact's data and
                 provide a category for the email ${contactEmail}.
                The categories to choose from are "Business" and "Personal".`
            }
        ],
        max_tokens: 50,
        temperature: 0.7
      };

    try {
        // Call OpenAI API
        const response = await axios.post(OpenAIApiURL, data, {
            headers: {
                'Authorization': `Bearer ${OpenAIApiKey}`,
                'Content-Type': 'application/json'
            }
        });

        // Save the OpenAI response
        const aiCategory = response.data.choices[0].message.content;

        // Save the response to our aiCategory output variable
        callback({
            outputFields: {
                aiCategory: aiCategory
            }
        });
    } catch (error) {
        console.error('Error communicating with OpenAI:', error);
        callback({
            outputFields: {
                aiCategory: 'Error'
            }
        });
    }
};
Replace YOUR_OPENAI_API_KEY with your actual OpenAI API key.
Also, remember to change the prompt in content inside the messages array for the want you need. You can test your prompt first in ChatGPT and give an example, this way you can optimize it and find the best one that suits your needs.
Step 4: Map Custom Code Input Fields
Map the input fields to match the data you want to send to the OpenAI API. In this example, we are using the contact's email address:
- Click on Set up input data.
- Add a new property with the name email and map it to the contact's email by selecting Email from the dropdown list.
- Save your changes.
Step 5: Handle Custom Code Output Data
After mapping the input fields, define how the output from the OpenAI API will be handled.
- Click on Set up output data.
- Add a new output variable and name it aiCategory.
- Save your changes.
Step 6: Save and Test the Custom Code
- Save your custom code action.
- Test the code by selecting a contact.
Saving the AI Response to a HubSpot Custom Property
Once you have the AI-generated category, you need to save it to a custom property in HubSpot. Follow these steps:
Step 1: Create a Custom Property
- Navigate to your HubSpot account settings.
- Go to Properties under the Data Management section.
- Click on Create property.
- Choose the object type (e.g., Contact).
- Fill out the property details. For example, you might name the property AI Category.
- Save the new property.
Step 2: Update the Workflow to Save the AI Response
- Go back to your workflow and click on the + icon to add a new action after the custom code action.
- Select Set property value.
- Choose the custom property you created (AI Category).
- Set the property value to use the output from your custom code action. Select aiCategory from the dropdown list of available outputs.
- Save your changes.
Step 3: Test the Final Workflow
- Activate the workflow.
- Test the entire workflow by enrolling manually an existing contact that meets the enrollment criteria.
- Verify that the custom property AI Category is updated with the AI-generated category.
Conclusion
Congratulations! 🎉 You have successfully implemented AI in your HubSpot workflows. By following this guide, you have:
- Leveraged the power of AI to analyze and categorize contact data.
- Integrated OpenAI’s API with custom code actions.
- Automated the process of updating HubSpot properties with AI-generated insights.
This achievement not only enhances your workflow efficiency but also paves the way for more personalized and effective marketing strategies. By automating data analysis and categorization, you can now focus on crafting targeted campaigns that resonate with your audience, ultimately driving better engagement and results.
Feel free to experiment further with different AI prompts and custom properties to continue optimizing your workflows. The possibilities are endless, and the impact on your business can be truly transformative.
You May Also Like
These Related Stories

How to make API calls from Custom Code actions inside HubSpot Workflows

How to Add Custom Properties to HubSpot Quotes


No Comments Yet
Let us know what you think